This is my go-to recipe for Sourdough Bread that I make every week. If you’re just getting started in Sourdough baking, here’s my guide on making a sourdough starter.
This schedule starts with pulling the starter out of the fridge and feeding it Friday morning, feeding and working the dough Saturday and allowing it to proof overnight, and then straight into the oven on Sunday morning.
As an Amazon Associate I earn from qualifying purchases.
Enjoy my recipes and patterns and want to support my site? Want to get a gift for yourself or others at the same time? Check out my Shop! New patterns, supplies, and goodies added regularly.
Easy Weekend Schedule, Sourdough Bread
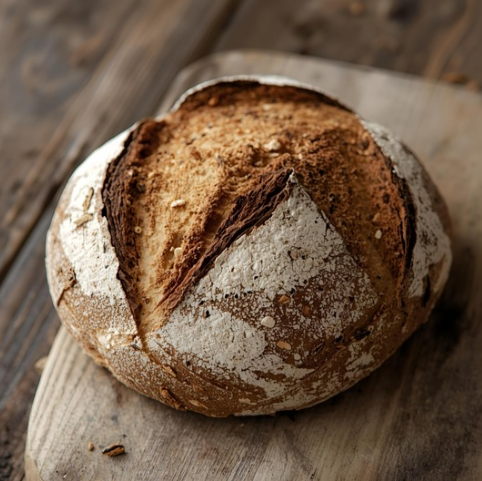
My every week consistent recipe for amazing sourdough bread.
Day 1: In the morning, feed your starter as you typically would, and allow to rise until doubled and active.
Day 2: Feed your starter & Prepare your dough
Day 2: In the morning, feed your starter as you typically would, and allow to rise until doubled and active. Must pass the water-float test (see notes).
In the afternoon, measure your water into a medium-large mixing bowl. Add your sourdough starter (can do float test now if preferred).
Whisk together the flour and the salt in a clean, medium-sized mixing bowl. Add to water and starter mixture.
Combine all ingredients together to form a rough dough, you may need to mix by hand to fully incorporate all of the ingredients.
In the mixing bowl, knead the dough for about 10 seconds, then allow the dough to rest for approximately 10 minutes. At this stage it should be quite sticky, and is what is sometimes referred to as the ‘shaggy dough’.
After 10 minutes, knead the dough in the bowl for another 10 seconds and allow to rest for another 10 minutes.
After the second rest has passed, knead for a final time, again it should only take 10-20 seconds. Your know your dough has a strong gluten structure when it is able to pass the ‘window-pane’ test. To perform the window-pane test, gently grab the dough from the middle of the ball and gradually begin to thin it, as if you’re making a pizza crust in the air. You want to be able to see the dough stretching until you can see light through the dough, without the dough tearing.
Once you have kneaded the dough the final time, shape it into a rough ball in the mixing bowl, and cover with a damp kitchen towel and allow to rise until evening. It should approximately double in size.
Evening: Place the dough on a lightly floured work surface and gently ‘punch down’. We just want to normalize the dough, and knock out a few air bubbles, without fully kneading it again. Form the dough into a tight ball and place within your prepared proofing basket (see notes). Dust the top of your dough lightly with flour and cover with a tea towel. Allow the dough to proof overnight in the refrigerator.
Baking the bread
When ready to bake, preheat your oven to 425°F with the dutch oven and lid placed inside.
Gently flip your proofing basket onto a piece of parchment paper and place the dough into the heated dutch oven. Once inside you will want to use a very sharp knife or a clean razor blade to score your dough (either in a straight line or a decorative pattern). If you’re concerned about scoring it within the hot dutch oven, it can be scored while on the parchment paper.
With the lid on, bake the bread for 25 minutes. Remove the lid and bake for 25 more minutes (50 minutes total). Carefully remove the bread from the dutch oven and place directly on the oven rack for another 5-10 minutes.
Once the bread is done, allow it to rest on a wire rack for 45-60 minutes. The bread is continuing to bake internally at this time. You’ll likely be able to hear it crackling as it cools.
Notes
To test if your sourdough starter is active enough for a bread, I highly recommend a combination of the rubber-band and the float test methods. For the rubber-band method – when you feed your starter, place a rubber-band around the jar/container at the height of your mixture. Once the starter has expanded to twice the height that it was previously, it should be ready to go. You can test this with the float method, by filling a glass or small bowl with water and dropping a small dollop (less than a Tbsp) of starter into the water. If it floats, that’s a good indicator that your yeast is ready!
It is highly recommended for breads (and many other baked goods) to use a Kitchen Scale and go by weight rather than by cup/volume.
The kneading in this recipe is generally fairly light/brief in comparison to some breads I’ve made, but if you have joint pain or fatigue, this recipe can easily be made with the assistance of a KitchenAid Stand Mixer and a dough hook attachment. I’ve found that the times for kneading are slightly increased if using a mixer (I might just be rougher with the dough ^_^;; )
Sourdough is an inherently sticky dough, please try to avoid adding too much flour to it as you’re kneading, as you’ll get undesired results. A Dough Scraper is your best friend in this case.
This recipe calls for a 9″ Banneton, or proofing basket. You can replace this with a mixing bowl that has been lined with a clean tea towel.
To prevent your dough from sticking to your banneton, it is recommended that you season it first. What this means is dampening the cloth of your proofing basket (or the rattan if you prefer it unlined) and dusting it evenly with flour. Allow this to dry completely (will take a couple of hours) and then lightly dust with flour prior to each use.
If you don’t have a Cast Iron Dutch Oven, you can use a thick-walled, oven-safe pot, so long as it has a lid. A large Pyrex dish with a glass lid would also work. The primary goal is an even cooking temperature and the ability to hold moisture in during the first half of the baking.
That’s correct! I know some people will feed their starters multiple times a day, but I’ve found that (at least for me and my climate) a single feed each morning is enough.
Usually I don’t. If you’re going to leave it for more than 1 week, I would recommend feeding it before putting it in the fridge, but with making 1 bread per week I’ve never had an issue.


5 Comments
Stephanie Kornett
So on day 1 after you feed your starter do you let it sit on the counter until day 2 when you feed it again?
Angela
That’s correct! I know some people will feed their starters multiple times a day, but I’ve found that (at least for me and my climate) a single feed each morning is enough.
Pingback:
Lisa
After mixing the dough, do you feed the remaining starter again and put back into the fridge?
Angela
Usually I don’t. If you’re going to leave it for more than 1 week, I would recommend feeding it before putting it in the fridge, but with making 1 bread per week I’ve never had an issue.