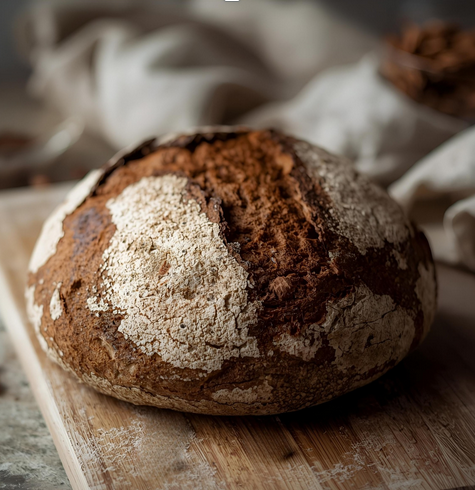
This bread is now my go to when I’m in the mood for a super sour, chewy, crusty bread. It reminds me of the artisan loaves that we used to get at an Italian deli outside of Chicago with an extremely dark crust and chewy center.
As an Amazon Associate I earn from qualifying purchases.
Enjoy my recipes and patterns and want to support my site? Want to get a gift for yourself or others at the same time? Check out my Shop! New patterns, supplies, and goodies added regularly.
Feed your starter for a few days prior to baking to ensure that it is bubbly and active. See Notes for how to determine if your starter is ready.
In the morning or early afternoon, feed your starter. (I usually do this step before going to work, or around lunch time depending on my schedule)
Mix your dough
In the evening (after dinner or after getting off of work), whisk together the starter, water, and honey in a large bowl. Add the flours and salt and mix by hand to fully incorporate dough. At this point it should be a fairly sticky, shaggy dough. Resist the urge to add additional flour. Cover with a damp, warm, cloth for 20-30 minutes.
After the dough has rested, knead the dough until it starts to form a more cohesive dough. Let rest for another 45 minutes.
After the dough has rested, knead the dough until it can pass with window-pane test (See Notes). Form the dough into a relatively smooth ball by gently tucking the dough under itself all the way around.
Overnight Rise
Cover the bowl with a warm, damp towel, and allow to rise overnight at room temperature. The dough should double in size and appear light and airy. (See notes for warmer or colder climates)
The following morning
In the morning, gently move the dough onto a lightly floured work surface. (See Notes on dough scraper to have an easier time of this) Shape it into a ball and allow it to rest for 10-15 minutes. Meanwhile – prepare your proofing basket/bowl (see notes for additional information).
If you are able to bake the bread in the morning – place the dough in the proofing basket using a dough scraper. Cover with a clean tea towel and allow to rest for 30 – 60 minutes at room temperature. If you are unable to bake the bread until that evening after work (or other scheduled activity) – place the dough in the proofing basket, cover with saran wrap (to prevent drying out) and place in the refrigerator for 6-8 hours.
Once ready to bake, preheat oven to 450 °F with a dutch oven and lid inside. Gently place your dough onto a piece of parchment paper and score as desired. (See notes if you do not have a dutch oven available)
Place the dough inside the preheated dutch oven with lid on. Bake on center rack for 20 minutes covered. Remove the lid and bake uncovered for 30 minutes. Carefully remove the bread from the dutch oven and bake directly on the rack for 5 to 10 minutes (or until crust is ideal crispness and color).
Place the bread on a wire rack to cool for at least once hour before slicing. (It continues to bake while cooling)
Notes
To test if your sourdough starter is active enough for a bread, I highly recommend a combination of the rubber-band and the float test methods. For the rubber-band method – when you feed your starter, place a rubber-band around the jar/container at the height of your mixture. Once the starter has expanded to twice the height that it was previously, it should be ready to go. You can test this with the float method, by filling a glass or small bowl with water and dropping a small dollop (less than a Tbsp) of starter into the water. If it floats, that’s a good indicator that your yeast is ready!
It is highly recommended for breads (and many other baked goods) to use a Kitchen Scale and go by weight rather than by cup/volume.
The kneading in this recipe is generally fairly light/brief in comparison to some breads I’ve made, but if you have joint pain or fatigue, this recipe can easily be made with the assistance of a KitchenAid Stand Mixer and a dough hook attachment. I’ve found that the times for kneading are slightly increased if using a mixer (I might just be rougher with the dough ^_^;; )
To perform the window-pane test, gently grab the dough from the middle of the ball and gradually begin to thin it, as if you’re making a pizza crust in the air. You want to be able to see the dough stretching until you can see light through the dough, without the dough tearing.
If you are making this dough in a warmer climate (Texas in the summer) it is possible for it to over-rise. While this won’t affect the flavor, it can make it so that your bread is a bit flatter overall when baked. You can shorten the rising time, cover with a cool damp cloth, or find a cooler area of the house for it to rise.
If you are making this dough in a colder climate (Minnesota in the winter), your dough may have a difficult time rising, even overnight. You can add a small pinch of dry active yeast to give your dough a boost, as well as finding a warmer place for it to rise. Wrapping the dough with a warm towel or letting it rest in a plastic mixing bowl as opposed to a metal one may also assist in rising.
Sourdough is an inherently sticky dough, please try to avoid adding too much flour to it as you’re kneading, as you’ll get undesired results. A Dough Scraper is your best friend in this case.
This recipe calls for a 9″ Banneton, or proofing basket. You can replace this with a mixing bowl that has been lined with a clean tea towel.
To prevent your dough from sticking to your banneton, it is recommended that you season it first. What this means is dampening the cloth of your proofing basket (or the rattan if you prefer it unlined) and dusting it evenly with flour. Allow this to dry completely (will take a couple of hours) and then lightly dust with flour prior to each use.
If you don’t have a Cast Iron Dutch Oven, you can use a thick-walled, oven-safe pot, so long as it has a lid. A large Pyrex dish with a glass lid would also work. The primary goal is an even cooking temperature and the ability to hold moisture in during the first half of the baking.
This came out great! As my schedule has me work in reverse I baked this around 11:30 pm instead of the morning but the finish on the rack makes a huge difference. It’s the final tweak I’ve been looking for!
Hello Teresa,
Not this particular recipe, but I have for my other sourdoughs with success! Depending on how you shape the dough I would recommend keeping an eye on it while it’s baking, for the most part the baking time shouldn’t change much (maybe cut 5 minutes out) to get the crust right, but if you have a significantly thinner loaf (like a baguette) it could dry out a bit.
Happy baking!
Wow! I’m so excited. I have tried and failed multiple times to make a sourdough rye. I followed your recipe and it was so easy. No stretch and folds for hours? It just came out of the o en and it’s beautiful 😍. Can’t wait for it to cool so I can cut it.
I’m so happy to hear that!
If you enjoy seeded rye, I also just developed this Seeded Rye Sourdough!
It should also be fairly simple and I think you’ll like it 😀
Great recipe, I don’t think I kneaded it enough so my bread fell flat. I should have used the bread hook because my wrists and forearms are not the greatest. I will try this again in the mixer, other wise it is super easy and still very tasty.
I use my regular starter for this recipe. I would be very curious to see how it turns out with a rye starter if you try it! My starter for reference -> Sourdough Starter – Making and Maintaining


9 Comments
Jason Morey
This came out great! As my schedule has me work in reverse I baked this around 11:30 pm instead of the morning but the finish on the rack makes a huge difference. It’s the final tweak I’ve been looking for!
Keira
I haven’t tried this out. I really should. I feel like it would be really tasty!
Teresa
Have you ever tried this as a half recipe? I like to make smaller loaves
Angela
Hello Teresa,
Not this particular recipe, but I have for my other sourdoughs with success! Depending on how you shape the dough I would recommend keeping an eye on it while it’s baking, for the most part the baking time shouldn’t change much (maybe cut 5 minutes out) to get the crust right, but if you have a significantly thinner loaf (like a baguette) it could dry out a bit.
Happy baking!
Lonnie
Wow! I’m so excited. I have tried and failed multiple times to make a sourdough rye. I followed your recipe and it was so easy. No stretch and folds for hours? It just came out of the o en and it’s beautiful 😍. Can’t wait for it to cool so I can cut it.
Angela
I’m so happy to hear that!
If you enjoy seeded rye, I also just developed this Seeded Rye Sourdough!
It should also be fairly simple and I think you’ll like it 😀
Ashley R
Great recipe, I don’t think I kneaded it enough so my bread fell flat. I should have used the bread hook because my wrists and forearms are not the greatest. I will try this again in the mixer, other wise it is super easy and still very tasty.
Lenka
Do you use regular or rye starter? I have both so I wondering which one to use for better results
Thank you
Angela
I use my regular starter for this recipe. I would be very curious to see how it turns out with a rye starter if you try it! My starter for reference -> Sourdough Starter – Making and Maintaining